December 17, 2013

Tips for Creating and Using Screencasts

Today I’m planning some lessons for a Spring workshop. One of the topics is how to create and use screencasts. Rather than start with software choices for screencasting I want to begin by demonstrating how to make screencasts good… effective… useful for the learners. And I want the workshop participants to consider screencasting as a classroom tool for both teachers and students to help with instruction.

When I prepare a screencast I usually clear off my computer’s desktop so folders and other icons that have no connection to the screencast are not displayed. I never thought about clearing off the hard drive icons, too, until I read Mel Aclaro’s 6 Must Do Tips for a Quality Screencast. How do I clear off the drive icons? Drag them over to a second monitor! Aclaro uses his second monitor to help with other details, too. He keeps items there that he plans to use in his screencast so he can pull them over to his first monitor when he wants them to show up on the screencast. It’s also a good spot to post my script or outline for the screencast.
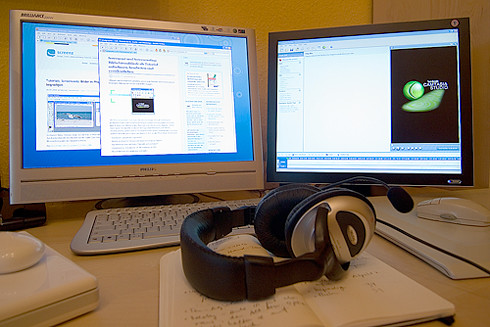
Screencast setup
Manuela Hoffman / Screencast Setup  /   CC BY-NC-ND 2.0

I know that not everyone has two monitors connected to their computers. I don’t. But, many of us have an old monitor that we could use for this purpose. And the IT person at school may likely have an old monitor that he could connect to one of the computers in your classroom. Plus… we have to think big. Right?

I appreciate screencasts that spotlight the cursor so it is easy to follow. I have used software that helps that to happen. But, Aclaro’s recommendation is so easy… we just use the Universal settings that allow us to enlarge the cursor. On a Mac we go to System Preferences > Accessibility > Cursor Size. We can see Windows instructions for doing this at Microsoft’s support page (http://windows.microsoft.com/en-us/windows/make-mouse-easier-to-use#1TC=windows-7).

These are just two of a half-dozen recommendations in Aclaro’s article/video for scaling up the quality of my screencasts.

Wesley Fryer urges us to plan and prepare when our students are going to create screencasts to demonstrate what they have learned. Will the students use photos? Find them. Make them accessible. (See Creating Narrated Slideshows & Screencasts.)

Mise En Place
Jen Waller / Mise en Place / CC BY-NC-SA 2.0

I would recommend that the script be written beforehand. Have it ready, too. Having everything at hand and ready to use reminds me of mise en place—the organizing and arranging of ingredients ahead of time for cooking. Having everything prepared saves time and allows us to focus on our goal whether it’s a delicious entrĂ©e or a helpful screencast.

Kathy Schrock’s Screencasting in the Classroom provides a wealth of resources on this topic. Two of the ideas I gleaned from her page include reasons why we (both teachers and students) might want to create screencasts and recommendations for creating and using those videos.

Schrock shares why teachers and students might create screencasts:
  • enhance explanations with visual information
  • model a process for students or for parents
  • peer-to-peer tutoring
  • respond to problems and questions
  • student presentations
  • summarize what has been learned
  • teach others
  • watch and answer questions about a topic BEFORE class
She also provides some recommendations about the videos:
  • keep videos short (less than 10 minutes)
  • use your voice in the video… students will respond to it better than to someone else’s voice
  • hold the students responsible… have them write a summary or answer questions
So… back to my planning. I think I will…
  • ask the participants about their experiences with screencasts
  • have them share their ideas for creating screencasts
  • provide a list of recommendations for creating quality screencasts (such as the ones in this article)
  • provide resources that they can search for more ideas that appeal to them (Scoop.it! has a great list)
  • and have them share their ideas with each other
And, of course, then they will create screencasts and share with us the techniques and ideas they used.

I think I have a good beginning. What would you recommend for the screencasting topic in this workshop?

December 9, 2013

It’s Time to Add to Our PLNs

My students – preservice teachers – learned how to create their own PLNs this semester. The students read education blogs and they wrote their own. They use a reader to make following blogs easier. They followed educators on Twitter… and they learn to tweet, to retweet, and to favorite. They shared as well as benefitted from what they read. Their favorite curation tools were Delicious and Pinterest. They created plans to curate and share what they learned as well as use it in their own soon-to-be classrooms. They also planned to publish their own experiences and ideas. They are excited about the opportunities that collaborating with others in our PLNs offers to today’s teachers.

One of the challenges when developing your PLN is to find blogs to follow. There are many excellent education blogs today, but each beginning teacher comes from a different place with individual experiences and needs. Choosing the first blogs to follow can sometimes be challenging. I, of course, make suggestions for a variety of disciplines. I also provides lists of award-winning and award-nominated blogs.

Vicki Davis (Cool Cat Teacher) has published an article about this year’s Edublog Award finalists and accompanied it with some of her usual wisdom and experience. In a message that I send to my students this week (exam week already!) I will recommend that they read her article and check out the blogs on the finalists list. You can read it at The Edublog Awards and the Legacy of Beth Holmes. I know that I plan to add to my PLN through the Edublog Award finalists list!

November 26, 2013

Haiku Deck is Available on the Web


What are an educator’s options for creating a presentation?

The first tools that come to my mind are PowerPoint, Keynote, Prezi, and Haiku Deck. PowerPoint is available for Windows and Macs, although the versions are not exactly the same. Work-arounds are available to use PowerPoint on iPads (to varying degrees). Keynote is available for Macs and iPads. Keynote is not available for Windows, but workarounds allow some degree of compatibility. Prezi is available for Macs, Windows, and iPads. Haiku Deck is available for iPads and the web.


Are these our only presentation options?

A recent article on Edudemic mentions Haiku Deck, Projeqt, and Google Presentations. The Crazy Egg blog published 19 Free Presentation Tools to Wow Your Audience. Their list includes several tools with which I am familiar (SlideShare, Google Presentations, Prezi, Zoho Show, and Jux) in addition to others. These two articles list some of the tools most used in education for PowerPoint-type presentations. Presentation software from other vendors is available, too. Of course, we can also use videos, podcasts, and other types of presentations.


How do we create outstanding presentations?

Creating a presentation and creating an outstanding presentation are two different things. How do we make sure our presentations are effective? That they accomplish the goals we have in mind?

I remember hearing in my first undergraduate education course that education causes a change. I did not agree at that point in my life, but I do now. The first time I tried Twitter I saw no advantage to using it. I had not learned anything in that first effort. The second time was not much better. But, the third time... I learned... and I have since changed and am still changing how I work with my PLN. I was certainly a slow learner, but I did eventually learn. How do I know? I changed. :)

So, what do I consider an outstanding presentation? One that causes members of the audience (or class) to change. In other words, they learn. One of the best handouts I have seen on giving outstanding presentations is The Creative Pathfinder: #24 How to Give an Outstanding Presentation. The recommendations are not new, but they are shared effectively: minimal text, large photos, few key points, no bullets, and a call to action. I think this handout and the resources listed in it are excellent.


Which presentation tool lends itself to this approach for designing effective presentations?

Haiku Deck seems to be created for the approach described in The Creative Pathfinder. I was delighted when Richard Byrne shared recently in his Free Technology for Teachers blog that Haiku Deck is now available on the web. (Up to this point it was only available for iPads.) I immediately signed up for it and began playing. You can see my first (slightly revised) Haiku Deck presentation at the beginning of this blog.

Richard Byrne has also provided a tutorial for the software. I had planned to provide a tutorial on this post this week, but instead I’ll just suggest that you check out his on Free Technology for Teachers!

So, what’s my call to action? Try Haiku Deck’s web version. I think you’ll like it.

November 25, 2013

Preparing Photos for Use

I enjoy taking photos... and playing with them. I am slowly creating my own "stock photographs" that I can use in class and in my blog. That lessens those time-consuming searches for just the right photo... and making sure it has an appropriate Creative Commons license. I keep two folders for these stock photos. One folder is titled Stock Photos; the other, Cartoons and Comics. The contents of the first folder are just regular photos, some touched up a bit to make up for my errors when shooting the photo. The second folder has photos that have been modified to look like cartoons or comics using one of two apps, ToonCamera and Halftone.

Today I have been playing with a new app, Pxture. It takes text that you type and fills it with an image that you choose. Or it can put your text on top of a photo. How I use Pxture will determine which folder holds the photos I create.

Here's some samples:

Stock photo (camera):

Cartoon (ToonCamera):

Comic (Halftone):

Image-enhanced Text (Pxture):

Would these apps help you and your students to create and/or modify photos for use?


Photos used with permission of Jo Schiffbauer

November 20, 2013

How Are You Using Photos in Your Classroom?


Ohio Fall / Phil and Jo Schiffbauer / CC BY 3.0
What story could your students tell about these photos? There is an actual story; but that doesn't matter. What story could your students write?

Or what mathematics problems could they devise for these photos?

What science is illustrated in the photos?

After you and your students take a field trip they could create a collage like this and use it in their discussion of what they learned.

Perhaps, after a lesson your students could take pictures to illustrate what they learned and create collages to post in the classroom as reminders of what they know now.

Collages are very easy to create with PicMonkey, a free website that you can use for online photo-editing. (A paid premium membership is also available, but you can do a lot with the free version.)
Hmm... Perhaps, the way to scale up this activity is to use augmented reality with it.

By the way, this blog post began because I was looking for a way to manipulate photos that I have taken (rather than using someone else's photos). I thought I was going to use a website that I have used in the past. That website truly does some fun manipulations with photos. It used to do it for free. But not now. I have no problem with folks getting paid for their work, but I was looking for something free. So, then, I returned to exploring.

A reference to Picnik brought back good memories, but Picnik is no longer available as a standalone site. PicMonkey, however, has been doing a good job as its successor in online photo-editing. I use collages personally to capture events and to share them. The next step was obvious. Think about using collages in the classroom.

Of course, using photos at school includes using them in blogs and other multimedia reports. The collages don't have to have as many photos as the one I used in the blog. They can serve the purpose of a blog post or multimedia report with just a few photos.

So, I shall start using PicMonkey collages for teaching and learning in addition to using them for personal sharing. And next... I need to play with augmented reality!

How do you use photos in your classroom?

November 11, 2013

Digital Skills Every Teacher Needs

Technology Use
Technology Use by Denise Krebs / CC BY 2.0

My appreciation for Med Kharbach's site, Educational Technology and Mobile Learning, has grown in recent months. I have learned from (and bookmarked) various articles from this site in the past. Recently, I have realized that the content on this site is not randomly good, but often--and usually--excellent.

The post that I discovered today (on Twitter) is The 33 Digital Skills Every 21st Century Teacher Should Have. Med Kharbach does not, however, just list these skills. He includes--for each one--tools that teachers can use to develop them.

Rather than share my own post today, I just want to lead you to his. Enjoy!

The 33 Digital Skills Every 21st Century Teacher Should Have
Med Kharbach
June 2012 
http://www.educatorstechnology.com/2012/06/33-digital-skills-every-21st-century.html

November 2, 2013

Considering Another Infographic Creation Tool

In mid-September I used Infogr.am to create an infographic. The process was interesting and relatively easy. While creating that infographic I learned more than how to use Infogr.am. I also learned a bit about what makes a good infographic. Or, actually, what doesn't. The quantity of data that I began to use was too much... and then what I condensed it to was too little. Consequently, the first graphic in the infographic I created is boring. Ugh! That was my fault, not Infogr.am's.

This time I decided to use Piktochart to make my infographic. I created an account. Their website includes instructions, videos, and even samples of very well done visualizations of data to inspire you! It's not difficult to work through the process of creating the infographic. You can take a tour of the product features, see a very condensed history of infographics (cave drawings to infographics), and read some case studies and testimonials.

The pricing options range from "forever free" to monthly or annual plans plus options for education, charity, and customized infographics. They provide social media contacts for communication with them in addition to an old-fashioned phone number. (If I seem excited about that, it's because I recently searched a vendor's website--several times--trying to find some way to communicate with the company.) Many examples of their themes and a user showcase are available so you can see a variety of infographics created with Piktochart.
Creation Toolbar

Piktochart provides resources that include tutorials, an e-book, and videos about infographics. The support section has an extensive FAQ list, a ticket system for support requests, and a forum. I found it easy to create an infographic on Piktochart due to all the tutorial help they provide and the intuitive user interface.
 
You can share the finished product on Twitter, Facebook, Pinterest, or Google+. You can also view it on the web. You can copy the embed code or a link. I used the embed code to place my infographic on this blog. It is also possible to save the infographic as a graphic.

So, how might you use an infographic that you created to help your students understand a concept? And what infographics might they create to present their knowledge on topics? 

CREDITS

Infographic created with Piktochart by Jo Schiffbauer